Monday
Sep102012

What if Responsibility, Respect and Resilience were the new Reading, Writing and Arithmetic?

As students hurry back to school and my own daughters are diving in to their 8th grade and Freshman year of high school, I am reminded of a little informal survey that I conducted a few years ago. Polling teachers I knew and encouraging them to share with other teachers as well, I wondered.... If you could teach your students anything, without concern for regulation or requirements, what would that be? What are the lessons that would be most beneficial to them as they being their journey though life?

While the poll was highly unscientific, I think the responses were priceless.

"I want my kids to know compassion and what it means to think about other people before they act.  I want them to be life long learners and be able to think for themselves and love doing it.  I hope that my students develop and continue to have a passion for knowledge and thrive on the quest it takes to get there." ~ Idaho teacher

"Lessons in listening for starters.   Lessons in questioning.  Lessons in conflict resolution." ~ Montana teacher

"Don't be afraid to try something new. We learn from failure. Failure is a positive thing, when we learn something from it." ~ North Dakota teacher

And one of my favorite from a North Dakota teacher....

"I feel that people need to learn how to maintain a positive attitude no matter what the situation.  There are going to be an overwhelming number of times in a person's life when everything will seem to fall apart but maintaining an attitude that allows you to see the silver lining in the situation will allow you to intern maintain hope.  And that hope for something better in life will inevitably allow you to see the doors of opportunity that you didn't know where there in front of you.  Being a positive person will lead to wonderful things - most of them on a small, day to day basis but all of those small blessings will add to a beautiful life."

I am grateful to all of those hard working teachers out there, striving to make this world a better place, and our children better people. As those of us venture on our own journey though life, perhaps we too can learn from these teachers and discover those small blessings we are given each day.

Remember that you too, are a powerful teacher, not only in your words, but in the example of the life you live. Go out there and be positive, count your blessings and create a beautiful life!

Sunday
Aug122012

Kitchen refresh, Before & After

When we first embarked on this adventure, there were a lot of unknown variables; the condition of the floor that lingered beneath the carpet, the potential for re-inventing the cabinets, overall layout, and the island. Each unknown addressed, each problem solved. The work was physically demanding, but rewarding as well. Breathing life back into a kitchen which had long been on life support for entirely too long proved to be worth the effort.

The cabinets had come together, the bead board inset was looking good, but for the bonus upper cabinets, I wanted something a bit different. I had seen in my research online that in some cases, glass had been added to the bonus cabinets and we lighted from inside, adding another layer of lighting to the kitchen. It was a look I really liked and felt if would break up the white field of doors that we were now facing.

After seeking out and visiting with the owner of the Stained Glass Workshop in Fargo, I selected a semi-opaque glass. I wanted something that would obscure the contents but let the optimal amount of light though as well. This glass was one of the few splurges that we made in the kitchen, at $70 for the 9 pieces we needed.

It sounds a bit odd to think of $70 as the splurge, but it really was one of those things that I just really wanted to be right. We could have gone with flat inexpensive glass and added a texture behind, but I really wanted this particular kind of glass. Other than the kitchen sink, it was one of the few things that I had a definite opinion about.

Tangent: the sink
Initially I was really set on finding a copper sink, I had spent time online researching them and had sought the advice of a few people I knew who had them. Advice received was a resounding, don't do it! Maintenance, staining, denting, etc. just proved to be more than I wanted to take on. Instead, reviews indicated that composite granite might be a better option. At the $300 range, the miser in me kicked in, I questioned the payoff in investing more in the sink vs. the faucet. I really liked the sink, but didn't want to shell out $300 for it. To my absolute delight as I was strolling through Lowes, as I was doing frequently these days, I noticed just the one I had decided I wanted, floor model, for $50. Done!

Back to the cabinets
The installation of the doors was a bit more challenging that we had first anticipated. A friend who had painted cabinets recently had warned us to be careful that the additional paint could cause the doors to not close properly. We had been very careful, and yet found between the additional paint and difference in hinges, they were a bit tight. After a bit of engineering and brute force, we were able to make the necessary adjustments.

Now that the glass had been purchased, installed in the bonus uppers, we needed to address how to light those cabinets. I researched a number of options and decided that the most economical was going to be a simple rope light. At $9 it certainly fit the bill for another couple of dollars, I picked up the clips made for installing it.

We opted for a simple dark knob and hinges to finish off our cabinet make over. The price of knobs has come down from the last time I had looked with many home improvement stores offering bulk packages and reasonably prices options.

Overall, we spent roughly two months, working on the kitchen, evenings and weekend with a few breaks and vacations in the mix. The expense of the endeavor was about $3,500, a third of which was devoted to the floor, along with the the purchase of a few tools, as well as linens, a few decorations, etc. There are still some areas that I have yet to decorate, but that will come in time. For now, we will sit back, look at the progress we have made and get back to the business of making the kitchen the heart of the home once again.

I must say, I couldn't be more pleased.

Friday
Aug032012

The mantel shelf - an alternative to upper cupboards

While re-imagining the side of the kitchen where we decided to move the stove and also held the refrigerator and dishwasher, the question that I kept facing was, what do we want to do above the stove? After evaluating the amount of cabinet space that I now had, I felt that I wanted to do something a bit different. 

We discussed building additional upper cabinets to match the existing ones on the other side of the room, but we really didn't need the storage space. I was a bit concerned about the room feeling more closed in with uppers on all sides. I began searching the web for options. Finding several mantel-esque shelves above the stove, that look really started to grow on me.

The look is nice, but it all comes down to functionality. So we began to identify what the needs were. It needed to house a light above the stove, There is nothing worse than not being able to see what is cooking on the stove. I also wanted power outlets and we needed to find some way to have at arms length, the spices we regularly cook with.

The basic structure is built from 2x4s. Perhaps overkill, but I had considered using it to store our plates, bowls, glasses, etc. in an open storage configuration and the last thing we wanted was to worry about it all crashing down. We used the same moulding that we had selected for above the doorways to trim the front, raising it just slightly creating a small lip so that nothing would roll off. The overall height is about 7 inches.

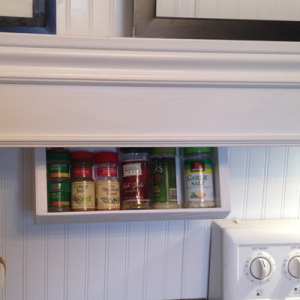
Creating a place for spices was another challenge. I was unable to find a spice rack that would keep our most commonly used items close by, without cluttering the counter, had the oil-rubbed bronze finish, and allowed us to hold only what we actually used.

The idea came maybe there was a way to build a spice holder into the shelf. We talked through a number of options, but the height of some of the containers was a problem. Could it be a drawer, could there be a hidden door in the front of the shelf? Nothing was quite right. Then the idea came, what if the spices were stored on their sides, out of site, and then drop down when needed? Tom quickly built a couple of wooden boxes and we picked up some hinges and added them to the underside of the shelf.

The problem was that once the latch was released, the the box dropped down and all of the spices fell out. We resolved this problem by adding a small wooden block with one side angled to hold the box at the appropriate angle. When closed the entire box is concealed within the shelf, one on either side of the stove.

With the need for support, having outlets hidden under the shelf would be a problem, so we chose to turn them on their side to be better concealed for the cleanest overall look. I also had an under-cabinet jar opener which found a home above the stove as well.

So, the shelf serves to be home to:

  • A light above the stove
  • Two spice boxes
  • Two power outlets (4 plugs total)
  • Jar opener

Still playing with how I would like to decorate the new space above, I pulled a couple of pieces of artwork that I already had and placed it in place for the interim. I have a few thoughts on what I would like to house permanently there. Unsure of what kind of grease, moisture and heat that area is going to be exposed to, I decided to give it a little time before placing anything too valuable there. So far, there seem to be no issues, and I can't wait to do something more striking for Christmas, and then perhaps I will be ready to create some art specifically for that space.

Up next....The cabinet door followup and installation.