Monday
Jun252012

Primed for Painting!

Once we had the door fronts cut, trimmed, sanded, had inserted bead board, filled all the nail holes, it was time to prime and paint so that we could really see what the doors would look like once they were all done. This was the moment of truth, was this really going to work and look attractive once we were all done? There is only one way to know, dive in and start priming.

I have long been a Sherwin Williams paint fan, our entire house has a coat of Classic99 in a variety of fruit flavors, and I really like how it goes on, covers and cleans up. Yes, they are more expensive, but my experience has been that it is well worth the couple of extra bucks. So back to SW I go, seeking some advice on painting cabinets. They recommended an Adhesion Primer followed by the ProClassic. We thoroughly washed the cabinets with TSP and lightly sanded them as well. The adhesion primer went on easily, and if its adhearing properties to the cabinets we anything like it was to my skin, I knew we would be in business.

Primed doorThe first thing I tested was the a cabinet door, I just had to see if this was really going to look OK. I brushed a bit on and could tell I was going to like this look. It didn't appear that the moulding was a inexpensive fix, an add-on. As I squinted at the door in the poor light of the garage, trying to blur out the brush marks, the more I looked, the more I liked. And this was just the primer, but the door was coming together. As was my vision for the kitchen. 

After the first couple of doors and further inspection of the base and wall cabinets, painting was going to be a big project and we started exploring best methods for getting that done. We decided to buy a paint gun.

We purchased the Wagner Power Painter Plus from Home Depot. It was under $100 and boasted that it would continue to paint as it was turned on its side and a variety of different angles. Since we knew the insides of the cabinets were going to be a tight fit with lots of interesting angles, we decided it was worth the extra money over the entry level model.

When using a paint gun, you really need to take the extra time to mask things off, and cover anything you don't want covered in a fine mist of primer/paint. We covered the floor of the garage with a large drop cloth and placed 2x4s on the floor to elevate the doors slightly, making it easier to get the edges of the doors more easily. The sprayer made short work of the priming and the doors were starting to really look nice all one color. After the priming I notice the grain on some of the raw wood, so I took a sanding block and just hit it one more time to even it out. We primed another coat and let dry thoroughly.

I had explored a few different color options and 50 different whites, and what I came back to was the plain, untinted stock white. I had considered a slightly off white color, but we already had white appliances that were in pretty good shape and I wasn't ready to finance that investment quite yet. In addition, since we were using white and a kitchen tends to be messy, I wanted to sure fire touch up without worrying about it not matching perfectly. The contrast of the white, with the dark flooring appealed to me as well.

Primed cabinetsNext, we are on to the cabinets themselves. The paint gun made short order of priming & painting the uppers and base cabinets and was worth the investment for that alone. Getting good coverage in the adjustable shelf brackets would have been a nightmare and within a matter of minutes it was done and looking good.

After cleaning the gun once, we took a bit of extra care in planning so we could prime one side of the doors then prime the cabinets, wait a bit, go back to the flip side of the doors and then back to the cabinets again. Not that the gun is that difficult to clean, but the primer did a great job of adhering to everything making it more of a pain to clean.

Things were really starting to shape up now and it was easier to visualize the space now. The gamble on the cabinet doors looked like is was going to pay off but we still had some scheming/planning/dreaming to do.

Up next....The Flip Side.


Monday
Jun252012

Cabinets? Cabinets!

New, refaced, or painted, that is the question? Not quite the $264,000 question, but we could see it from here. When facing a kitchen remodel, cabinets can be a significant investment. Apart from appliances, (which is an entirely different discussion) cabinets are likely the most expensive part of a kitchen remodel. It was a decision I spent a lot of time pondering, planning, replanning, calculating and a few sleepless nights of a racing mind.

Our situation was this: the cabinets were custom-built in the 1950s, were very sturdily built, but lacked storage space, counter top and had very plain-flat-faced doors. They were built from birch and were stained a light oak color. We had one 10 foot run of cabinets with a small 6 inch jog at one end where the stove was located. In the middle of the run was the sink leaving very little working counter space.

Over the 15 years we had lived in the house, I had pondered how to dress up the cabinets. I painted the existing knobs, got a great deal on new knobs on eBay, had tried to figure out a way to add moulding to them to dress them up, but never found anything I really felt was worth the money or effort.

In the dreaming/planning stage, I visited with every home improvement cabinet department, some custom cabinet companies, refacing companies, etc., and reviewed all of the options. It was quite overwhelming, so many options! Here is a brief summary of what I found:

New cabinets: this of course if the most appealing option, everyone loves new. But, it comes with a price. After pricing out new cabinets for my space, dream cabinets, we were looking at about $30,000 + counter top and organizing supplies. There are many justifications for going all new and I know a lot of people who have gone that route, but I am pretty frugal and was choking on the $$ just a bit. And then there is the "do it right, or not at all" argument. Well, we had gone the "not at all" route, and there really wasn't much longer we could continue on that path. Was it time to just bite the bullet and do it right?

For couples who are looking at resale, I understand that the kitchen can be the make-or-break in a sale and the investment is warranted. Our house was built by my great-grandparents, my children are the 6th generation of my family to live in the house. At this point, I really can't see selling it outside of the family and looking to cash-in on a resale just isn't in my mindset. That said, our house needs to serve us, my husband and I, as we will likely be here long term.

Reface Cabinets: I researched this a bit, and the changes can be pretty impressive, and the cost can be as much as half of new cabinets. There are a number of options available, cabinets styles, finishes, etc. They place a veneer over your the cabinets and replace the doors. The doors being the most expensive part of that process and I had 20 doors and 8 drawers. Not a single one a standard size. Still a significant investment, but the same old cabinets. Or we could attempt to build our own doors, after all we are pretty handy. We would need to invest in some new tools, but it was doable.

Paint/Stain the existing cabinets: This was the least expensive of the options, the most labor intensive on our part. I have seen both the good and the bad versions of this option. This of course didn't solve the flat-faced cabinet doors. With a number of colors, techniques, theories it is also one of the most flexible/changeable over time.

Decisions, decisions...

One of the beautiful aspects of our house is the dark woodwork and lots of it, and I had envisioned that we could go with dark cabinets to tie things together. In the refinishing of the floor, there was a very dark colored stain which caused us to need to go with a dark floor stain. The thought of dark cabinets in a room with one small window and a dark floor, seemed a little depressing. I had determined that light cabinets were in order. Painting was looking better all the time.

Through a series of conversations, what we decided was a priority at this point in our lives were our girls. Hope, a freshman this coming fall, and Megan an 8th grader we were looking at 4-5 years until they were likely starting to head off on their own. Focusing time and money on family right now seemed like the logical choice, deciding to revisit our kitchen needs after the kids were gone and we had a feel for what we were going to need when it was just the two of us.

And then, I came across this video, which made me think about the potential of our doors: 

I have always loved the look of glass cabinet doors, but my cabinet organizational skills are always not conducive to having transparent doors. Luckily, glass is easily frosted and having done some stained glass work in the past, I knew there were some beautiful options available. Although, when looking at new cabinets, the doors we had liked best and felt fit the vintage of the house, had bead board in the center. The wheels started to turn, maybe there is something to this? We could do this, what did we have to lose?

The Plan

Profile of the trim moulding

Finding the right trim and cutting out the center of the door. I think this just might work. If nothing else, we are committed now, no turning back.

We took a door and decided to give it a shot. I picked up some trim that I thought would work at Lowes making sure the profile would be right to cover our cuts as the video showed, and some quarter round to finished the back side. Here is the moulding we went with: Stain Grade Pine Ply Cap Moulding which was under $5 for an 8 foot length. Remember this is going on the inside of the cut you make in the door.


Corner miterYou will want to miter the corners at a 45° angle like a picture frame, this might take a little trial and error to get just right, so pick up a couple of extra lengths.

Before & with Trim

To secure it all together we opted for another purchase, the Micro Pin nailer. Now there are brad nailers which uses really tiny nails, but the Micro pin is even smaller. Probably a hair smaller than a stick pin, it holds well and the holes are far less visible. We picked ours up at Menards, this is the one we chose: Micro Pin Nailer. We shot in from the top as well as in from the side to make sure it wasn't going anywhere.

Next, we played with glass vs. bead board material for the panel and the quarter round on the back side. I wasn't completely happy with how that quarter round trim looked on the inside and opted to just use the same moulding on the inside as we had on the outside since it really wasn't that much more expensive and made for a nicer finish inside.

AfterAs far as the glass vs. bead board debate, we decided to use the bead board on the upper and base cabinets, but glass on the row of "bonus" cabinets which are smaller cabinets above the upper cabinets.

Pleased with the result we decided to move forward cutting and trimming the remaining doors.

Up next....Prime & Paint!

Wednesday
Jun132012

Doing the goundwork

As we set out to spruce up the kitchen, we had considered a number of things; gutting it and starting over, refacing the cabinets, painting the cabinets, but everything was hinging a bit on the floor. A couple of different people had told us that there was hardwood under the carpet, but no one really could tell us what kind of shape it was in, if there were any major issues, what kind it was, etc. Before I was ready to pull up the carpet, I wanted a plan for if it actually was hardwood, what if it wasn't, and what is the plan if we pull the carpet and there is a major flooring issue?

In any nearly one hundred old house, you don't expect things to be level and square, but we could feel some heaving in the floor just a bit. Squeaks here and there, but the worst spots seemed to be nearly in the center of the room. We pulled a corner of the carpet back and through multiple layers of carpet glue we found hardwood. 2.25" maple to be exact. At least we knew what we were working with now, at least on the edges, but what was lurking beneath the carpet in the center of the floor, eluded us.

Finally, Tom (my husband) decided we would move the table and pull the carpet back and take a peek. About half way through pulling the carpet back, he looks at me and says, "You realize this isn't going back down." Not really a question, but more of a we, "we have reached the point of no return," brace yourself.

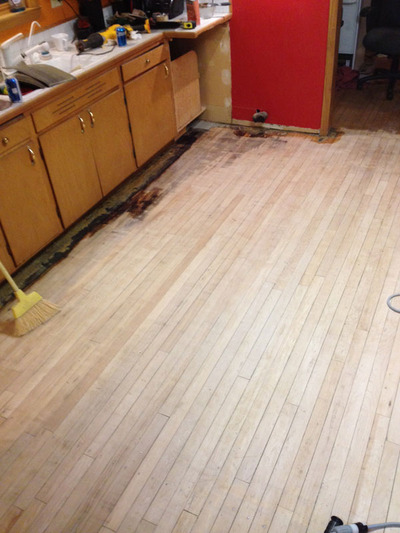
So the carpet comes up, and the floor appears intact, no major issues through the span of the flooring. But the finish has darkened with age and the layers of carpet glue were hard to really tell for sure. Next stop, floor sander.

 I had done enough research online to have seen both camps; don't even attempt to do your own floors and the "it really isn't that hard." Being relatively handy, we figured we would give it a shot.

I had researched random orbital floor sanders online and found one nearby to rent. So off we went to collect it. It worked well, but didn't have enough power to eat through the carpet glue. Back to the store and we brought home a drum sander. This did wonders, chewed through the carpet glue and down to raw wood. I couldn't believe ho great it was shaping up.

And then we got to the spot in front of the sink. It had a dark stain, and no amount of sanding was even touching that bad boy, no wood stripper, bleach and a variety of other wood lighteners could make a dent. So we made the decision to go with dark stain and try to blend it in.

Being in the relative early stages of a Pinterest addiction, I started searching for more dark wood floor concepts. And the more I saw, the more I liked. The house has very dark woodwork and we had talked about doing dark wood cabinets, but the floor was destined to be dark.

The first coat of stain went down, and all of a sudden the many blog posts of why you shouldn't sand your own floors came flooding back to me. You could see every little mark from the drum sander and it wasn't pretty. So back to the sander we go!

Sanding, and then sanding some more, and then sanding some more, trying to get it as smooth as possible. Finally, we resorted to an orbital sander, a 6 inch orbital sander. That is a LOT of time on your knees!

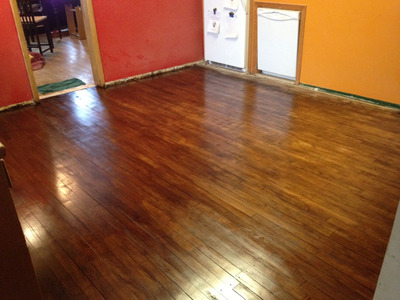
So after several days of hard labor, sore aching shoulders, raw knees, we decided to try again. This time, the stain was going down beautifully and we finally could tell that all of the hard work had paid off. It was going to take several coats to get the darkness/richness that we wanted, but the stain was looking good.

This photo is about midway through the staining process and was still wet.

Finally, the floor was starting to take shape. From the monster lurking from deep down below the Berber, to a farmhouse hardwood floor. Flaws of 100 years of love and use, but beautiful nonetheless. Evidence of not just a house, but a home. A home full of love, and life and activity. Floors that my very grandfather crawled across as a child. How could I possibly see anything but love, even through the sore muscles and exhaustion. This is "home."

up next......cabinets! cabinets?